h1

Reporting on your reports with BIxPress

June 30, 2012

SQL Server Reporting Services (SSRS) is the latest portion of the BI stack to get some attention in the most recent version of BIxPress.  Two new features are included in BIxPress 3.5, Reporting Performance Monitor, and Report Deployment Tool

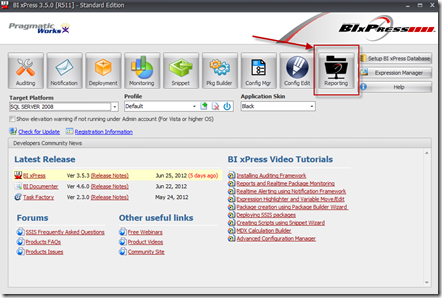
I’m going to take some time now to walk through how easy it is to get the  Reporting Performance Monitor configured and running.  From the BIxPress start up screen you can see the new reporting icon.

image

Clicking on it will launch the reporting console.  From here the first step is to configure the connection to the report server database. To do this click on the server icon.

image

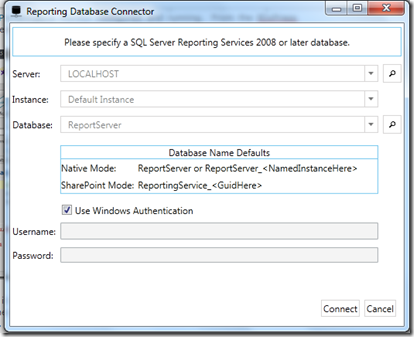
The connection screen will appear and here you will configure the server, the instance and the database for your report server database.  On my local machine everything is set to the default.  You can also choose windows authentication or supply a Username and Password instead.

image

Once that is done you are ready to start monitoring your reports.  There are a few things that I want to point out, though they might seem a little obvious to most of you.  The Reporting Performance Monitor will only give you details about reports that are deployed to the report server, not reports that are run in BIDS or Report Builder.  With that being said lets take a look at some of the details you can get you hands on.

image

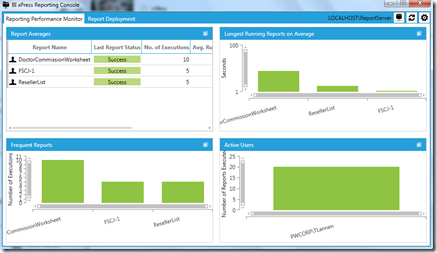
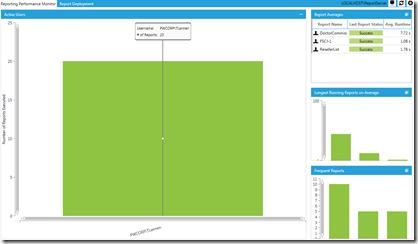
This is the view when you first run the Report Monitor after connecting to the report database.  There are four report:

  1. Report Averages
  2. Longest Running Reports on Average
  3. Frequent Reports
  4. Active Users.

If we click on each report we get a more detailed view. There is a icon on the top right corner of each report that will expand the view.

image

The Report averages chock full of great information. It includes the Last report status, meaning did the report succeed or fail during its last execution, the number of times the report has been run, and its average run time.  Then it breaks down the average runtime into Averages on data Retrieval Time, Processing Time, and Rendering time, so you can quickly see what is the most time expensive portion of your report.

image

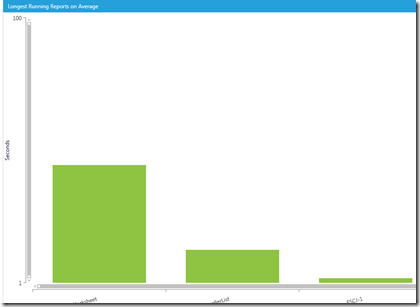
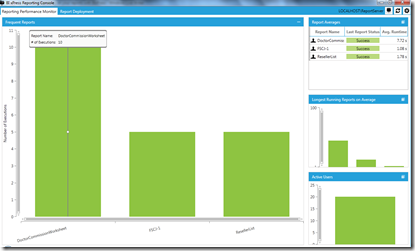
The other reports are not quite as dense as the first report but still offer valuable insight into your reporting environment.

image

image

image

There is a ton of useful information here and you can be sure that the brains behind these reports will be adding more to this console as new versions come out.  If you’d like to have your voice and suggestions heard regarding any of the Pragmatic Works software make sure to visit our Feature request page. In the meantime please take a minute and download a trial of BIxPress and test out this cool new feature and the many other features that span the SQL Server BI Stack.

h1

SQL Server Indexed Views Barney Style

June 26, 2012

During my first few weeks at a new client I was asked to do some DBA tasks that I don’t normally do.  They were in the process of developing a new application and as a result a legacy DB was being carried over inside a new DB as a series of views instead of physical tables.  While the views rendered the data correctly they query performance went from a matter of less than 10 seconds to more than 10 minutes, and this was just on development data, not a full production cycle.  So with the performance blown out of the water they asked me to do a some research and see what was causing the slow down.
The first thing I did was looked at the tables in the legacy DB to see if there were indexes on the corresponding tables, and as I’m sure you’ve guessed, there were.  As I’m sure you have also deduced the indexes weren’t created in the new DB on the views.

At this point the only thing I really knew about creating indexes on views was that you could.  So I did a little digging and found out what was required to create and indexed view.  Of course I didn’t discover all of this at once, but instead after every hurdle I cleared I was presented another one.  So for your benefit and mine, I’m going to share with you what I’ve learned about indexed views.  As you can tell by the title, this is not an all inclusive dissertation on SQL Server indexed views.  This will be very much an introduction so I hope you get what you need from it.

So the first thing that I tried that didn’t work was scripting out the index from the old table and try adding it to the view.  This brought up the first requirement I found.  I got an error saying the view didn’t have Schema Binding on it.  I had no idea what this meant but I found the MSDN article that listed what Schema Binding was:

SCHEMABINDING

Binds the view to the schema of the underlying table or tables. When SCHEMABINDING is specified, the base table or tables cannot be modified in a way that would affect the view definition. The view definition itself must first be modified or dropped to remove dependencies on the table that is to be modified. When you use SCHEMABINDING, the select_statement must include the two-part names (schema.object) of tables, views, or user-defined functions that are referenced. All referenced objects must be in the same database.

Views or tables that participate in a view created with the SCHEMABINDING clause cannot be dropped unless that view is dropped or changed so that it no longer has schema binding. Otherwise, the Database Engine raises an error. Also, executing ALTER TABLE statements on tables that participate in views that have schema binding fail when these statements affect the view definition.

So I did what was suggested and dropped and created the view with schema binding.  Great the view was created so I was ready to create the index again.  That was of course when the next error popped up.  The underlying tables where in different schemas which isn’t a big deal except, on top of that they had different owners for each schema, and that my friends is not allowed.

At this point my brain actually started to work properly, and in a stroke of, well not genius but somewhere above a drunken stupor and genius, I decided to search out how to create an indexed view instead of figuring out each error as it popped up.  That lead me to this MSDN article.

A view must meet the following requirements before you can create a clustered index on it:

  • The ANSI_NULLS and QUOTED_IDENTIFIER options must have been set to ON when the CREATE VIEW statement was executed. The OBJECTPROPERTY function reports this for views through the ExecIsAnsiNullsOn or ExecIsQuotedIdentOn properties.

  • The ANSI_NULLS option must have been set to ON for the execution of all CREATE TABLE statements that create tables referenced by the view.

  • The view must not reference any other views, only base tables.

  • All base tables referenced by the view must be in the same database as the view and have the same owner as the view.

  • The view must be created with the SCHEMABINDING option. Schema binding binds the view to the schema of the underlying base tables.

  • User-defined functions referenced in the view must have been created with the SCHEMABINDING option.

  • Tables and user-defined functions must be referenced by two-part names in the view. One-part, three-part, and four-part names are not allowed.

  • All functions referenced by expressions in the view must be deterministic. The IsDeterministic property of the OBJECTPROPERTY function reports whether a user-defined function is deterministic….

The list goes on from there, but you get the point.  There is a lot of prep work to do before creating an indexed view.  You might find it hard to go back and create an index on a view if you hadn’t planned it out well in advance.  with that being said here is the basic syntax for creating an indexed view, assuming all other conditions are met.


SET NUMERIC_ROUNDABORT OFF;
SET ANSI_PADDING, ANSI_WARNINGS, CONCAT_NULL_YIELDS_NULL, ARITHABORT,
QUOTED_IDENTIFIER, ANSI_NULLS ON;
GO

IF OBJECT_ID ('dbo.vTest', 'view') IS NOT NULL
DROP VIEW dbo.vTest ;
GO
CREATE VIEW dbo.vTest
WITH SCHEMABINDING
AS
SELECT SUM(ColA*ColB) AS Revenue,
ColC, ColD
FROM dbo.TableA AS a, dbo.TableB AS b
WHERE a.ColE = b.ColE
GROUP BY ColC, ColD;
GO

CREATE UNIQUE CLUSTERED INDEX IDX_V1
ON dbo.vTest (ColC, ColD);

I hoped this helped get you on your way to creating indexed view.  For more information please check out these MDSN Articles 1, 2  and 3

h1

No Complaining, it works.

June 24, 2012

In my job as a consultant I get exposed to a wide variety of working environments, some collaborative, some social, some conventional. Often times there are politics that I am unaware of, and quite frankly I try to stay out of, because I’m not there to take anyone’s side, I’m there to help the meet that goal.   This can be quite a stressful existence at times.  On top of all of these work environments I am introduced to, I also have the work environment back at my company office, which admittedly is better than most places I’ve been, but that doesn’t mean that from time to time there are not any complaints. 

When work at a client site is ratcheting up my stress level, either because of approaching deadlines, or on nights like tonight when I’m away from my family and my wife has to take the brunt of the parenting, or when I’m commiserating with co-workers to are facing the same challenges I am, it all seems a bit too much.  I start resenting the fact that I have to travel, and that I’m under pressure at work for a client because they have deadlines to meet.  Sometimes I just let all of these frustrations snowball until I want to call in sick for a month.  In the end regardless of the reason, I’m just not happy from time to time. After a particularly bad string of weeks I spent traveling I just felt out of control, and not the “I’m pissed and I’m not going to take it anymore”, but more of the “something’s got to give” sense. 

It was at this time, where I was looking for a way to improve my situation that I came across a book we had at the office, titled The No Complaining Rule by Jon Gordon.  This isn’t your typical self help book (not that I’m able to judge that since this is the first one I’ve read cover to cover).  It tries to teach you through the use of a fictional story.  The main character of the book, Hope, is facing problems at work that could get her fired, problems at home with her children, and health problems as well.  Add all of this up and if any one had a right to complain it was Hope.  Early in the book its easy to see the authors point is that complaining is a easy habit to get into, to feel justified in doing and can be infectious to others.

It was at this point that the authors words started to make sense to me.  I’ve definitely been in the situation where I didn’t think something was a big deal or reason to get upset, but after talking with someone else, who thought it was a huge, end of the world type deal, it became a much bigger deal to me.  Looking back it seems silly to me that I let somebody’s feelings on a topic make me miserable, but I’m sure it happens more often then we are aware of. Anyway, back to the book.

As the story moves on Hope meets someone who introduces her to the no complaining rule.  As it turns out it isn’t just one rule, but a number of rules, that revolve around complaining.  As you would expect the Hope resists, then applies the rules to her life, and after 150 pages everything is great and wonderful in here life.  While the overall “cheese” factor of the book might be a turn off I did feel like a learned some valuable takeaways from The No Complaining Rule

The most important one of which was that complaining is ok, as long as its constructive complaining.  This is more than just pointing out problems, because that’s pretty easy, and we can create more problems than actually exist once we get in the habit of complaining. This is pointing out a problem and in the next breath offering some solutions to those problems.

One of the other takeaways from the book was that complaining and negativity are more of a choice than we might believe.  This has helped me a lot over the last few months.  I’ve just made it a rule to stay out of negative conversations with people, and to try and cutoff conversations that are just people venting their frustrations and complaints at me as quickly as possible, but not getting drawn in.  Every time somebody complains I just look for a way to spin the conversation into a different direction.  These might seem like obvious coping mechanisms to some of you, but when your bogged down in the negativity it can be hard to see a way out.

This book helped me just take a look at myself and ask why I was unhappy.  I realized that I was letting things get to me too easily, I was listening to people who were unhappy and letting their state of mind rub off on me.  Once I was able to stop my own complaining and limit my interactions with other complainers I saw a dramatic change in my job satisfaction, and my general outlook as a whole.  This isn’t to say there haven’t been or never will be any complaining again, but I now at least have some ways of combating them when they do creep up.

h1

Document SQL Server 2012 with BI Documenter v4.5

May 31, 2012

A while back I wrote a series of blogs on using BI Documenter, and since then there have been some updates to BI Documenter which I believe are worth mentioning. The first new feature, or set of features if you think about it, all of the existing BI Documenter features are now compatible with SQL Server 2012.  This means that as your company migrates to SQL Server 2012 Documenter will be able to make the transition with you, which I think is pretty awesome.

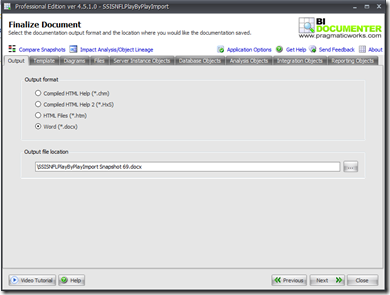
The second feature that I wanted to mention with v4.5 is BI Documenter files can now be outputted to a Word document (.docx). I really like this new feature simply because it’s a file format that so many people are familiar and comfortable with. You can quickly upload the file to a SharePoint document library making it easy to store and share. 

image

The one thing I had been concerned about regarding this feature was, what if I’ve installed documenter on a server and scheduled the snapshot to run from there and I don’t have Word already installed on the server, since it isn’t really needed.  I hate when I have to go and install an application on a server just so I can create the document, even though it will never be consumed there.  Well BI Documenter uses the open xml format, which eliminates the need for Word to be installed on the server to create the document. Furthermore using the open xml format allows other programs that support the .docx format can view the Word document output from BI Documenter. Go and download BI Documenter and test out these features and many more.

h1

Annoying DB Restore Error

May 30, 2012

The other day I was at a client site, and I was trying to set up my development environment to begin working on some SSIS packages.  I was on the next to last restore of 12 separate DB (all told, over 500GB), when the restore failed.  Up to this point I hadn’t had any issues at all.  Then this sucker popped up:


TITLE: Microsoft SQL Server Management Studio
——————————
Restore failed for Server.  (Microsoft.SqlServer.SmoExtended)
For help, click: http://go.microsoft.com/fwlink?ProdName=Microsoft+SQL+Server&ProdVer=10.50.1600.1+((KJ_RTM).100402-1539+)&EvtSrc=Microsoft.SqlServer.Management.Smo.ExceptionTemplates.FailedOperationExceptionText]&EvtID=Restore+Server&LinkId=20476
——————————
ADDITIONAL INFORMATION:
System.Data.SqlClient.SqlError: File ‘C:\Program Files\Microsoft SQL Server\MSSQL10_50.MSSQLSERVER\MSSQL\DATA\SomeNewDB.mdf’ is claimed by ‘SomeNewDB_UserData'(3) and ‘SomeNewDB_Primary'(1). The WITH MOVE clause can be used to relocate one or more files. (Microsoft.SqlServer.Smo)
For help, click: http://go.microsoft.com/fwlink?ProdName=Microsoft+SQL+Server&ProdVer=10.50.1600.1+((KJ_RTM).100402-1539+)&LinkId=20476
——————————
BUTTONS:
OK

The link provided in the first part of the message led absolutely nowhere, and the second one wasn’t much help either.  Strangely enough I read the error message a few times, and for once I was able to determine what the problem was.  Here was the key to the error message:  File ‘C:\Program Files\Microsoft SQL Server\MSSQL10_50.MSSQLSERVER\MSSQL\DATA\ SomeNewDB.mdf’ is claimed by ‘SomeNewDB_UserData'(3) and ‘SomeNewDB_Primary'(1).

So what I did was script out the restore and discovered that I was trying to use the .mdf file twice.

RESTORE DATABASE [SomeNewDB]

FROM DISK = N’C:\SQLBackup\SomeNewDB.bak’

WITH FILE = 1,

MOVE N’SomeNewDB_Primary’

TO N’C:\Program Files\Microsoft SQL Server\MSSQL10_50.MSSQLSERVER\MSSQL\Data\SomeNewDB.mdf’,

MOVE N’SomeNewDB_UserData’

TO N’C:\Program Files\Microsoft SQL Server\MSSQL10_50.MSSQLSERVER\MSSQL\Data\SomeNewDB.mdf’,

MOVE N’SomeNewDB_Log’

TO N’C:\Program Files\Microsoft SQL Server\MSSQL10_50.MSSQLSERVER\MSSQL\Data\SomeNewDB_1.ldf’,

NOUNLOAD, REPLACE, STATS = 10

GO


So I changed the second file to .ndf and ran the script and it seemed to work.

RESTORE DATABASE [SomeNewDB]

FROM DISK = N’C:\SQLBackup\SomeNewDB.bak’

WITH FILE = 1,

MOVE N’SomeNewDB_Primary’

TO N’C:\Program Files\Microsoft SQL Server\MSSQL10_50.MSSQLSERVER\MSSQL\Data\SomeNewDB.mdf’,

MOVE N’SomeNewDB_UserData’

TO N’C:\Program Files\Microsoft SQL Server\MSSQL10_50.MSSQLSERVER\MSSQL\Data\SomeNewDB.ndf’,

MOVE N’SomeNewDB_Log’

TO N’C:\Program Files\Microsoft SQL Server\MSSQL10_50.MSSQLSERVER\MSSQL\Data\SomeNewDB_1.ldf’,

NOUNLOAD, REPLACE, STATS = 10

GO

So if you ever run into that problem make sure your not trying to reference the .mdf file twice inside your restore statement.

h1

BIxPress Now with SQL Server 2012 Support

May 30, 2012

Last week Pragmatic Works launched it’s latest version of BIxPress with some great new features.  At the top of that list of new features was adding support for SQL Server 2012 SSIS Packages.  The Auditing Framework, Notification Framework, and Snippets you’ve come to rely on in your 2008 and 2005 environments are now available in 2012. 

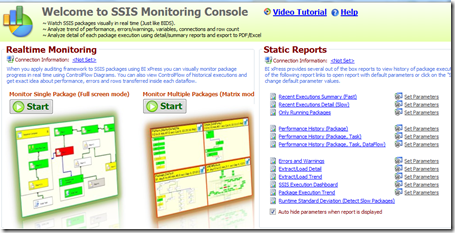
Once you’ve tried out the real time monitoring console from BIxPress, it will change the way you monitor packages in your SSIS environment forever. No longer do you have to watch your package in Debug Mode inside BIDS.  Neither do you have to wait for an error notification to be sent to you if a package fails.  You can view packages that have been deployed to your server as they are running, just as if you had opened them up in bids.

image

You don’t have to worry about conflicts between some of the new features in 2012 and features in BIxPress, because they are either disabled or removed completely in this latest release of BIxPress. 


Check out all the new features of BIxPress here.

h1

BIxPress MDX Calculation Builder

April 30, 2012

This weekend at SQL Saturday 130 I gave presented a session on Introduction to SSAS, and after my session one of the attendees came up to me and asked how to create what amounted to a rolling 30 60 and 90 days calculation inside of SSAS.  Since this was an 100 level session, the attendee hadn’t ever seen an MDX expression so walking her through the calculation would have been a bit over her head. This is a common problem for most developers just getting into cube building with SSAS.  MDX is a difficult language to pick up.  Thankfully Pragmatic Works has some software that can help with that. 

When I’ve written about BIxPress in the past it has mostly been about the SSIS features it contains, but SSIS isn’t all it does. BIxPress has an MDX calculation builder that plugs in to the Calculation Tab inside of BIDS in you SSAS project, and its not that difficult to use, meaning you don’t have to write any MDX at all. Yes I am serious and don’t call me Shirley (thank you Leslie Nielsen)

As I said before, navigate to the calculations tab in you SSAS Project inside of BIDS. Once there, and if you have BIxPress installed of course, you will see a little green calculator button has been added to the tool bar.

image

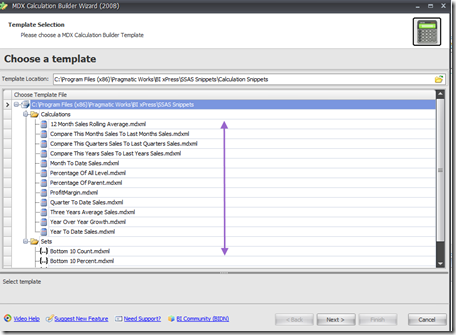
When you click on the icon, a list of available calculations and sets are presented in a new window. These include calculations like Month to Date and Percent of Parent, as well as sets returning Top 10 Count or Top 10 Percent.

image

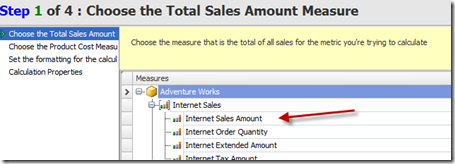
In this example I’m going to do the Profit Margin calculation, so I select it from the list and hit next.  The first thing I’m asked is to provide the measure that represents the total for Sales.

image

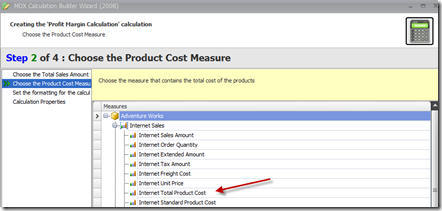
Once that is selected I need to provide the Total Cost.

image

(Notice I haven’t written any MDX yet) The next screen allows me to set any conditional formatting, like text color or Red for Profit Margin of <%15 or something to that effect, but I don’t need that for this example.

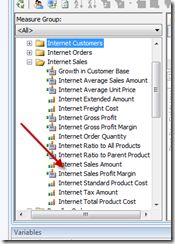
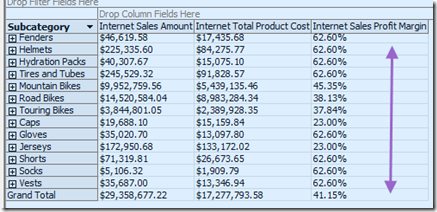
On the last screen we give the Calculation an Name and associate it with the correct measure group(Internet Sales Profit Margin, and Internet Sale respectively) and then click finish.  Once that is done, build and deploy the cube, and just like that you have a new calculation in your SSAS cube, and you didn’t have to write a single MDX expression.

image

image

Take a look at this and many other feature of BIxPress by Downloading a trial version here.  Also if you have any suggestions for additional calculations, or other features you’d like to see in BIxPress or any of the Pragmatic Works software products, post them here.

h1

Task Factory Advanced Execute Package Task

April 30, 2012

If you’ve ever developed any kind of SSIS auditing framework, chances are you’ve wanted to pass variables from the child package to the parent package.  As you know it can be accomplished, but it takes some hoop jumping including writing some code in a script task.  As I’ve said before, scripting is not my strong suit, so if there is a way to work around it, I’ll give it a try.

Thankfully Pragmatic Works has made the work around unnecessary with the new component in the ever growing list of SSIS components.  The Advanced Execute Package Task component allows you to easily configure the passing of variables between packages in both directions.

image

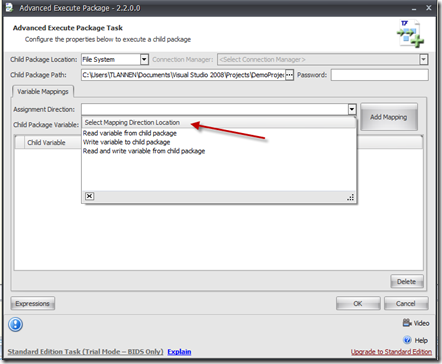
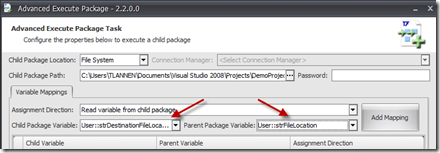
The component is easy to configure.  Once you’ve selected the location of the package you want to execute, either SQL Server of File System, the next step is to assign the direction of the variable mapping.  There are three options, read from child package, write to child package, read and write variable from child package.

image

Once that is selected (in this case I’m going to read the variable from the child package) the next step is to select the variable from the child package you want to read.  The nice thing that the Advance Execute Package Task does, is that it only allows you to map variables of the same type. This means that if you choose a string variable in the child package you can only choose string variables in the parent package.

image

Once the variable mapping is set the way you want it, click the add Mapping button.  This adds the mapping to the package and you can now configure another variable.

image

With this component it is very easy to pass variables back and forth between packages.  Don’t take my word for it, download Task Factory for yourself and try it out.

h1

SSIS For Loop Containers Part 2

March 30, 2012

    In the continuation from my previous post on For Loop Containers I’ll give you a little more practical example of using the container.

    A “Watcher” package is used quite often for checking for the existence of a file in a folder or for a row to be inserted into a table. Lets set one up. Here’s what its going to do:

    1. Check for new records in a source table.

    2. If there are new records in the table, then rows will be inserted.

    3. If there are not any new records, the package will enter into a wait loop, and “sleep” for 1 min

    4. then iterate through the loop again.

    5. Exit the loop once the rows are inserted.

      1. First lets set up the variables we are going to need for this project.

        image_thumb[20]

        Next lets set drag a For Loop container on to the design pane and configure it. Unlike the first For Loop we set up we are going to leave the InitExpression and the AssignExpression blank, because as you remember from earlier they are optional. In the EvalExpression enter this:

        @dtMaxDestinationLoadDate >= @dtMaxSourceLoadDate

        That is all we have to do here. So far this is even easier to configure then the first one, but hold on it’s the use of the control flow that adds the complexity. We will be using a couple of execute SQL tasks to populate our two variable used in the EvalExpression.

        Here is the create Script for the Source and Destination Tables

        CREATE TABLE [dbo].[ForLoopSource](

        [ID] [int] IDENTITY(1,1) NOT NULL,

        [Name] [varchar](50) NULL,

        [LoadDate] [datetime] NULL

        ) ON [PRIMARY]

        CREATE TABLE [dbo].[ForLoopDestination](

        [ID] [int] IDENTITY(1,1) NOT NULL,

        [Name] [varchar](50) NULL,

        [LoadDate] [datetime] NULL

        ) ON [PRIMARY]

        I’ll leave it to you to populate the tables with data, but there are some name generator websites out there that you can get pretty big datasets from if you need them, or you can just pull the data from Adventure Works.

        Drag in an Execute SQL Task and configure your connection. Then enter this code:

        SELECT

        ISNULL(MAX([LoadDate]),‘1/1/1900’)MaxSourceLoadDate

        FROM

        [Demo].[dbo].[ForLoopSource]

        Once you’ve entered the query make sure to set the result set to single row, and then map the result set to the dtMaxSourceLoadDate variable. Then click ok.

        image_thumb[22]

        image_thumb[24]

        Do the same for the next Execute SQL Task but set up for the dtMaxSourceLoadDate.

        SELECT

        ISNULL(MAX([LoadDate]),‘1/1/1900’)MaxDestinationLoadDate

        FROM

        [Demo].[dbo].[ForLoopDestination]

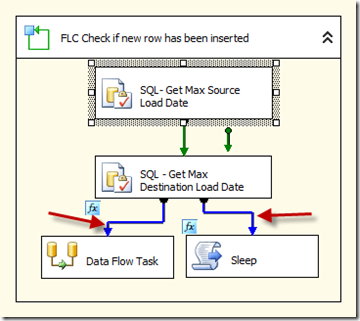
        The next step is to set the conditions that determine which path the package should take. We do this by adding expressions on the precedence constraints.

        image

        When the expression for the constraint on the left @dtMaxSourceLoadDate>@dtMaxDestinationLoadDate evaluates to true, the package will proceed to the data flow task and load the new rows into the destination table.

        When the expression for the constraint on the right @dtMaxSourceLoadDate<=@dtMaxDestinationLoadDate evaluates as true, the package will proceed to the script task which puts the loop in a wait status before it returns to the top and iterates through again.

        Its in this script task that we use the third variable that we set up at the beginning intWaitTime.  Here is the VB.net for the script task

        Public Sub Main()
                Dim sec As Double = Convert.ToDouble(SnippetParameter(“User::intWaitTime”,””,””))
                Dim ms As Int32 = Convert.ToInt32(60 * (sec * 1000))
                System.Threading.Thread.Sleep(ms)
              Dts.TaskResult = ScriptResults.Success
              End Sub

        By making a variable to configure this instead of hard coding the value in the script task gives us the option to later on configure that variable in a table with package configurations. Once the wait is over the package loops again, until the destination table has a date that is greater then the max date in the source table.

        Inside the dataflow you source query should look like this.

        SELECT        Name, LoadDate
        FROM            dbo.ForLoop
        Where LoadDate > ?

        with the parameter mapped to @dtMaxDestinationLoadDate.

        I hope this helps you all get a better grasp on how For Loops can be used to enhance the functionality of you SSIS packages.

        Until Next Time…